How to Level a Shed Base on Uneven Ground
Leveling a shed base is less about building and more about negotiating with the ground.
Whether you’re dealing with a sloped garden or a site where a concrete mixer can't reach, the earth always makes an "opening offer." Traditional methods meet that offer with high-commitment materials like concrete and irreversible digging.
For the builder who values flow over friction, there is a more forgiving way to handle the terrain. It allows you to reach a "level agreement" without the commitment anxiety of a permanent pour.
The Adjustable Base
Instead of trying to force the ground to be flat, you install adjustable posts that act as the interface between the earth and your structure.
The BASIS system is designed around tolerance. These posts allow for threaded height adjustment at every support point. Because each post moves independently, one can extend 20cm to meet a low corner while another stays at 5cm on the high side. Your frame stays level while the posts absorb the inconsistencies of the slope below.
Read more about building a timber frame base
What This Replaces
Traditional options force you to make the ground cooperate:
Concrete slabs: Excavate high side, pour permanent pad. Works well on flat ground. Becomes expensive on slopes (€2,600-4,900). If ground settles, slab cracks—repair requires breaking and repouring.
Ground screws: Anchor deep, bypass surface issues. Requires specialized equipment (€1,200-2,500). No adjustment once installed.
Blocks & shims: Stack blocks, shim to level. Cheap (€90-180) but requires annual re-leveling as blocks shift.
Adjustable posts: Compensate for slope mechanically. Same-day installation (€520-660). Readjustable if ground settles.
Learn more about ground movement
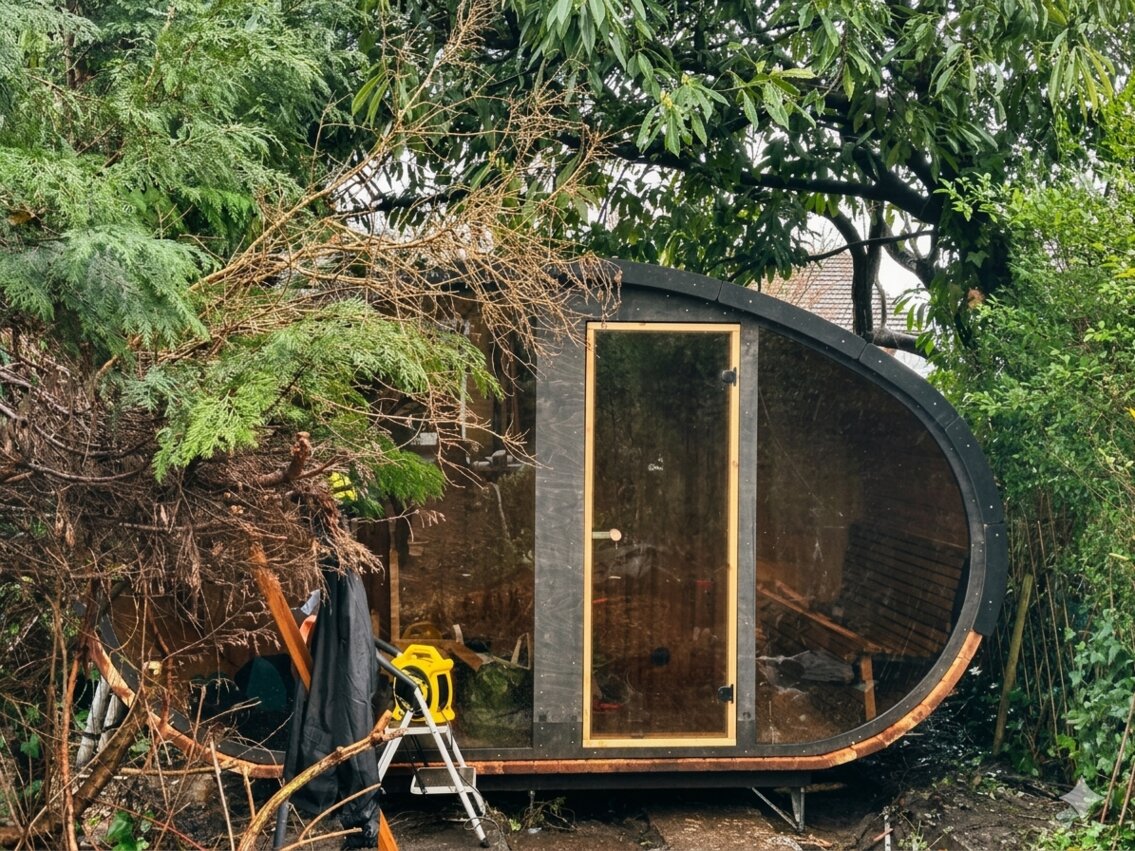
Case Study: Managing a 40cm Gradient
This 20sqm sauna project faced a significant elevation change: the ground dropped 40cm from the front to the back of the site.
- The Scenario: A 40cm slope usually means building a retaining wall or moving a lot of soil to create a flat site.
- The Regulation: The builder didn't attempt to flatten the hillside. He roughly evened the ground where the shovel still bit and bypassed the remaining gradient with the adjustable posts.
- The Tolerance: Inconsistencies in the digging were absorbed by the threaded rods during the final leveling process.
The Financial Reality
| Method | Cost | Labor/Process |
|---|---|---|
| Traditional Path | €4,800 | 10 days including labor and curing |
| The BASIS Path | €790 | Materials and same-day installation. |
The Outcome: A €4,010 reduction in cost. Because the system is correctable, any future settling in the soil can be regulated with a wrench.
How does this mechanism actually work? Let's look inside the post...
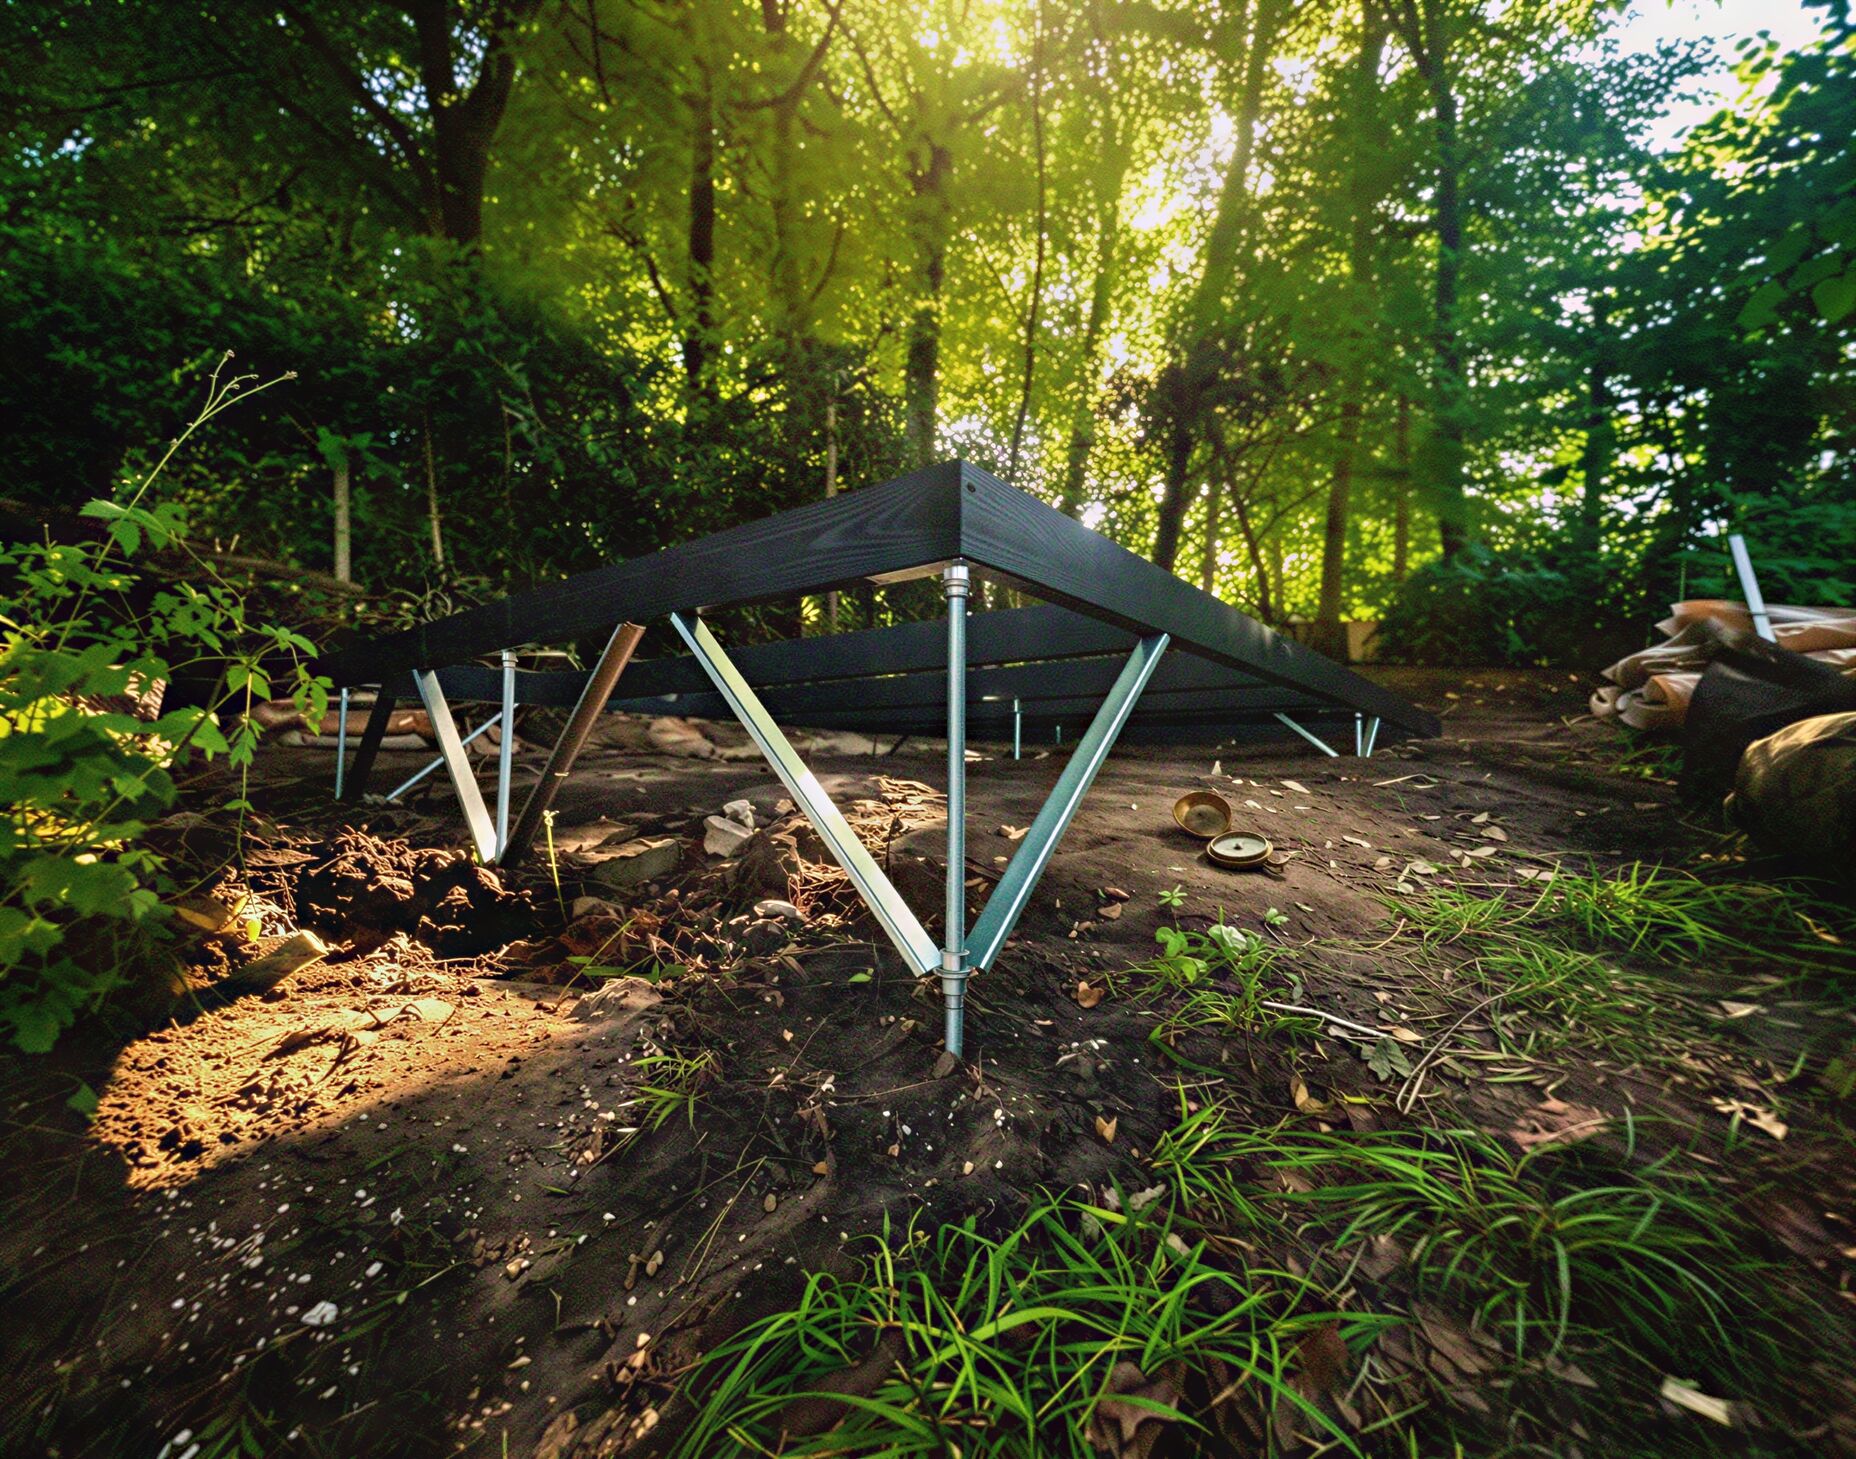
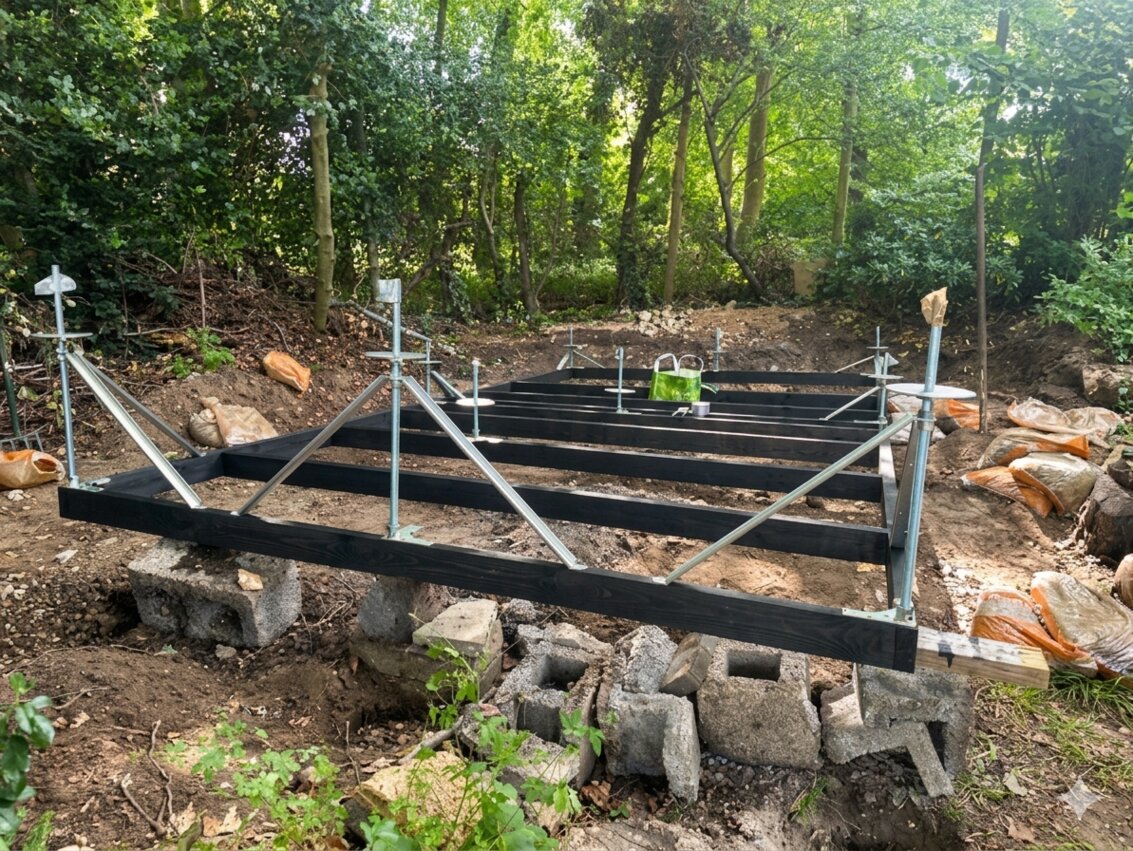
The Adjustable Post
To understand how we can level a subframe on an uneven ground, look at the post as a mechanical jack. It doesn't just hold weight; it manages the relationship between your building and the earth.
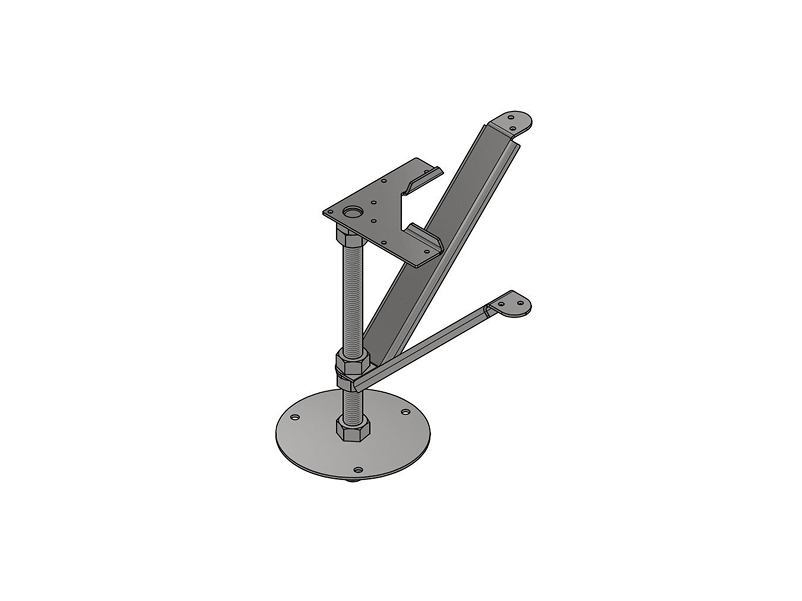
1. Establishing Stability
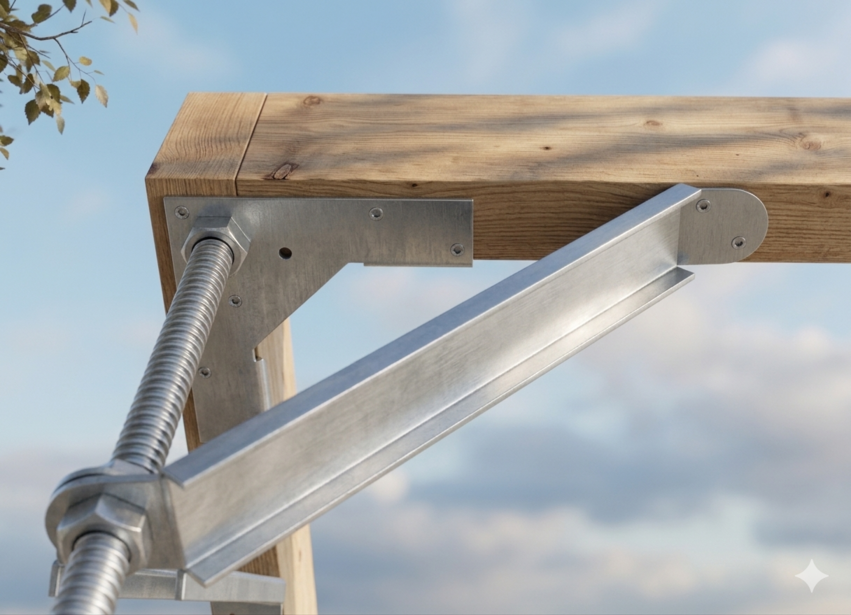
The L-Connector and the diagonal Stabilizing Braces are fastened to your timber frame with screws. By tightening the braces with nuts, you achieve triangulation—turning the post and the frame into a single, unified unit. This prevents the structure from swaying, regardless of the incline.
2. Precise Height Regulation
Once the top is locked, the only moving part is the Base Plate. Its position is governed by the Adjustment Nut(red).
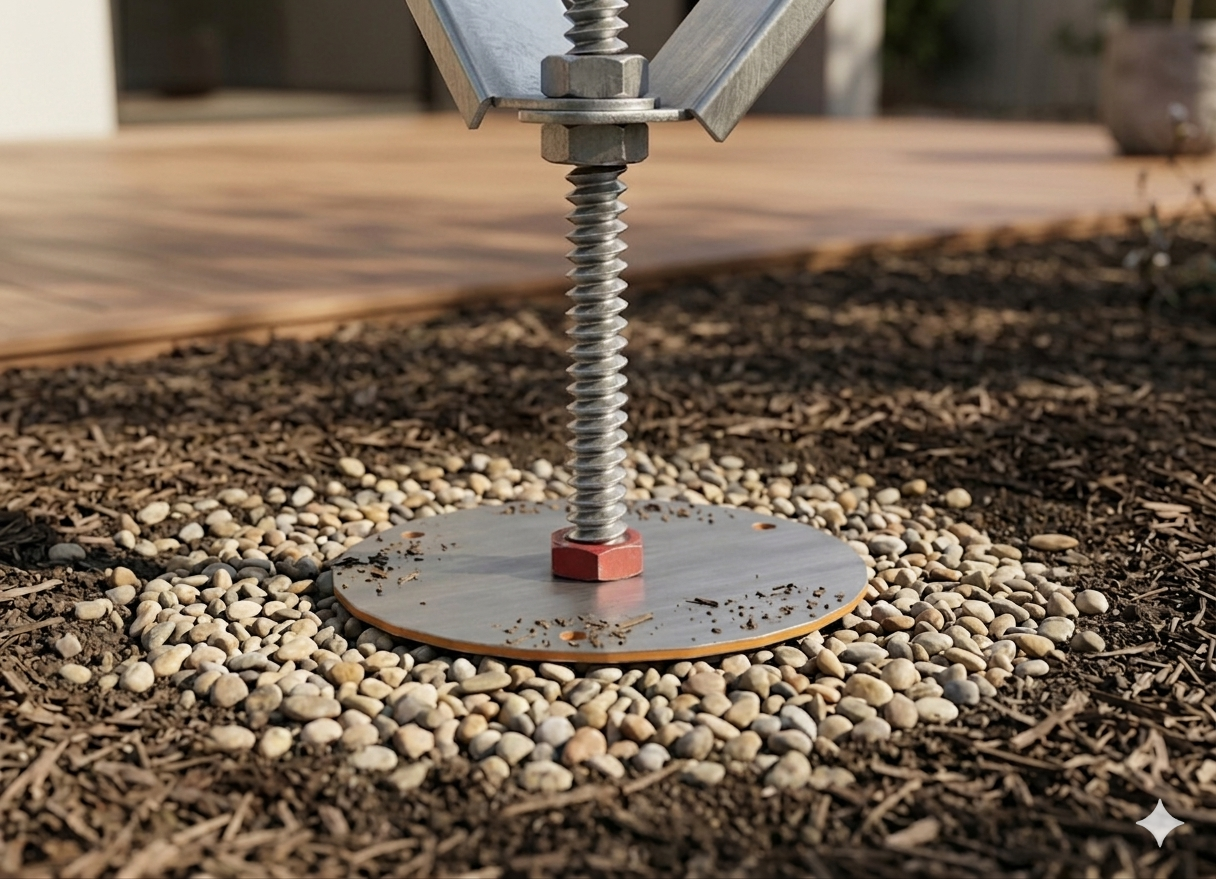
- To Lower the Frame: Turn the nut up the thread. The building descends safely, and the rod simply passes through the base plate.
- To Lift the Frame: Turn the nut down. It pushes against the base plate, guiding the structure upward.
This mechanism ensures that mistakes are recoverable. If you over-adjust, you simply turn the nut back.
3. Adapting the Range
BASIS-03 offers a total 30cm adjustment range. You can modify the triangulation by bending the "ears" on the diagonal braces.
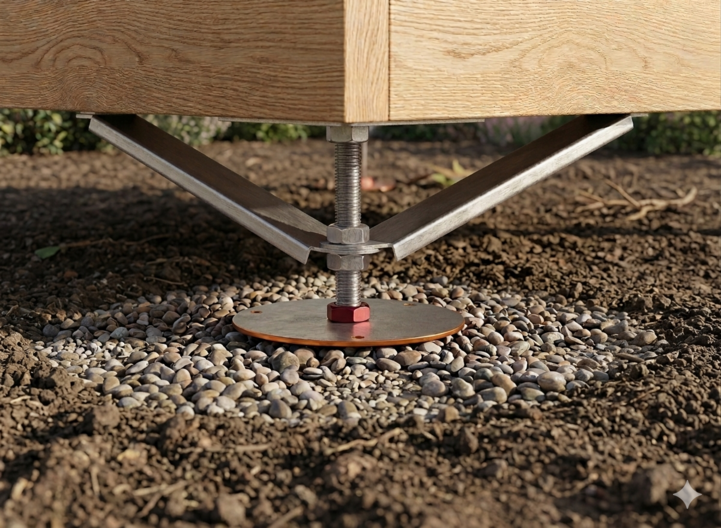
- For Maximum Travel: The "ears" on the braces can be bent to a leaner angle, allowing the frame to sit lower while maintaining stability.
- For Low-Profile Builds: If your ground is already close to the frame (within ~10cm), the braces can be omitted entirely because at low heights, there is no need for lateral stabilization. Note that the lower the frame sits, the further the threaded rod passes through the base plate.
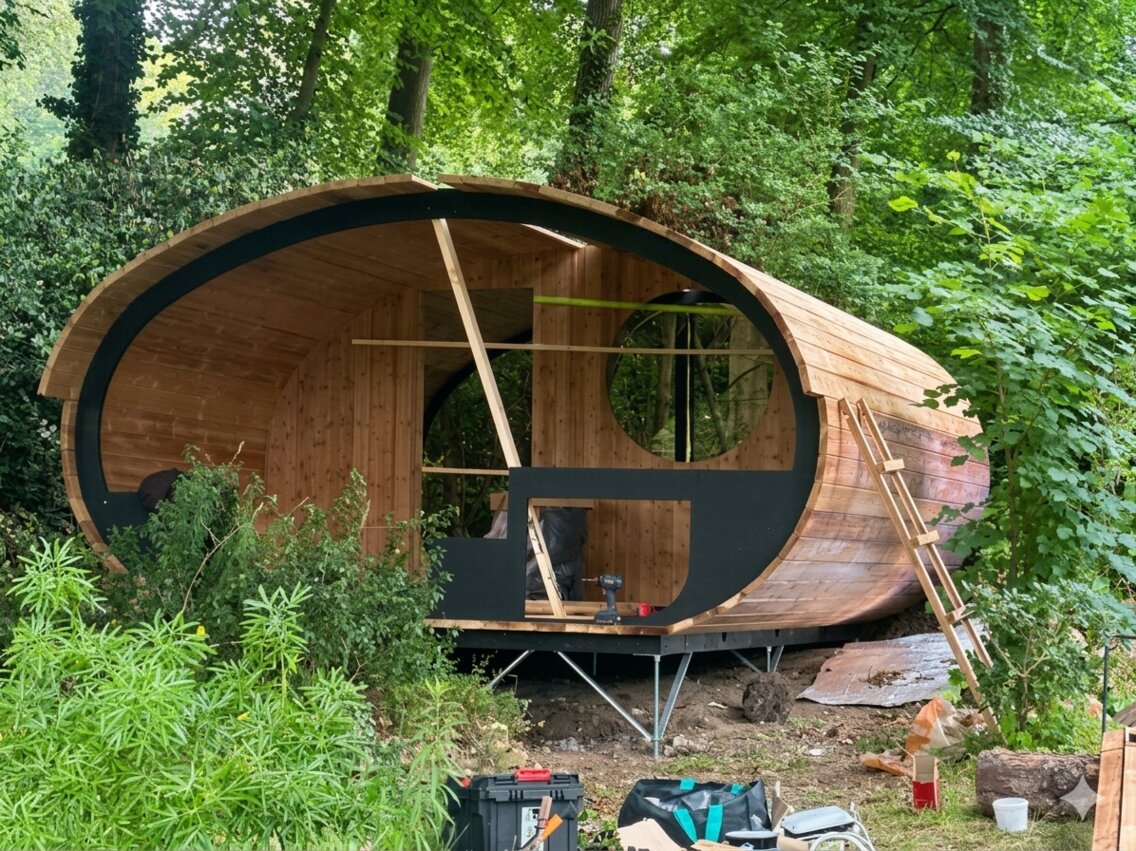
Case Study: Building Over Inconsistent Ground
This 4x2m sauna was built on a site with mixed ground conditions: half of the area contained the concrete ruins of an old building, while the other half was stony earth.
- The Scenario: Normally, such inconsistency requires a jackhammer to clear the ruins so a uniform foundation can be poured.
- The Regulation: The BASIS system allows the building to be isolated from the ground's history. Posts were placed exactly where the ground was stable—some on the old concrete, some on new gravel pads.
- The Tolerance: The ruins were not treated as an obstacle, but as a support point
The Financial Reality
| Method | Cost | Labor/Process |
|---|---|---|
| Traditional Path | €3,200 | Requiring site clearance and a high-volume concrete pour |
| The BASIS Path | €480 | 6 posts |
The Outcome: €2,720 saved by choosing a foundation that is indifferent to ground debris. The builder achieved a level result by regulating the height of each contact point independently.
Ground Prep for the Contact Points
With adjustable foundations, you don’t need to prepare the entire site.
You only prepare the small spots where the posts touch the ground.
This keeps excavation minimal and avoids the need for heavy equipment.
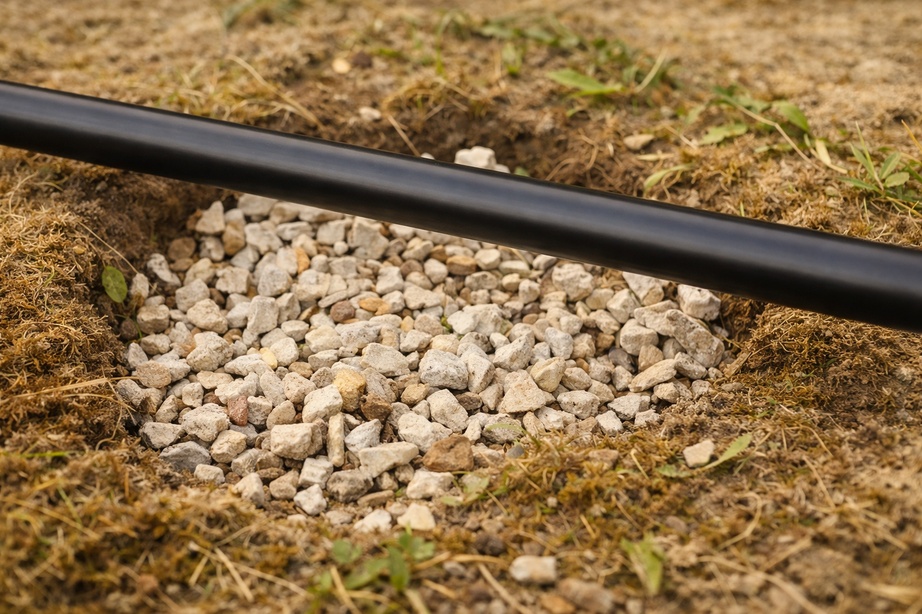
1. Gravel Pads
On soft soil, clay, or damp ground, it’s best to create a small gravel base under each post.
Dig a hole:
Excavate a roughly 300 × 300 mm area where each post will sit.Add compactable gravel:
Fill the pocket with MOT Type 1 or similar gravel in two or three layers, tamping each layer firmly before adding the next.Set the post on the pad:
The gravel spreads the load and allows water to drain away from the base.
This small gravel pad prevents the ground from lifting in winter or shrinking during dry periods. When possible, this method is highly suggested.
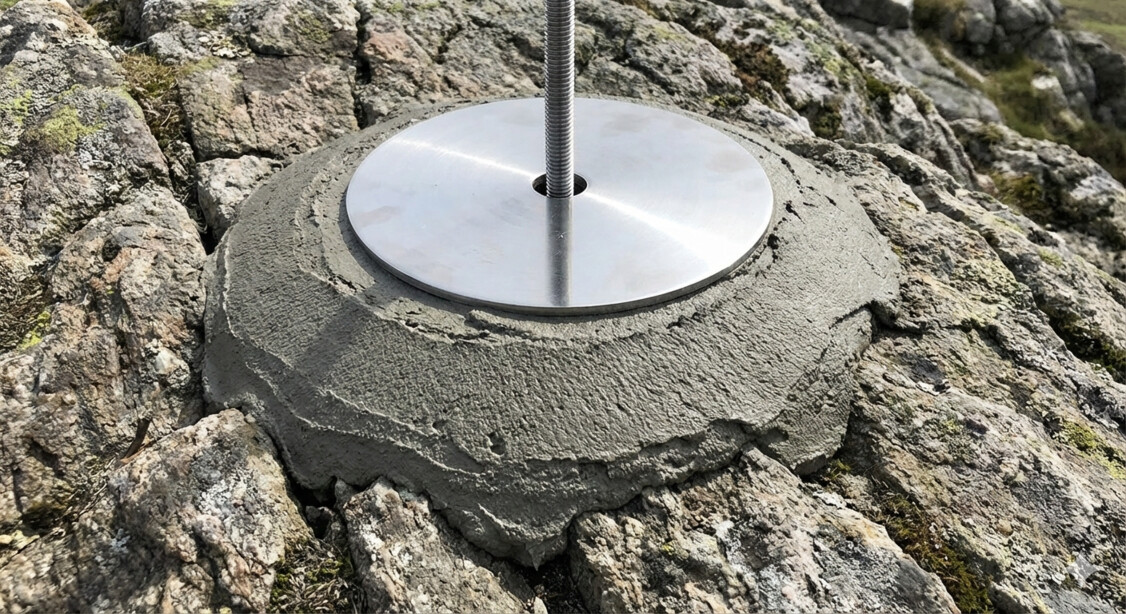
2. Bedrock or Large Stones
If you encounter solid rock while digging, it can actually make an excellent foundation point.
Drill a locating hole:
Use an SDS+ rotary hammer with a ~22 mm bit to drill a hole about 10 cm deep.Seat the threaded rod:
The rod drops into this hole, helping prevent the base plate from sliding.Create a flat seat if needed:
If the rock surface is uneven, place a concrete paver or a small mortar pad underneath the base plate. Make sure the base plate rests flat on the ground.
If the threaded rod is too long for the drilled depth, it can easily be shortened with an angle grinder.
Read more about building on bedrock
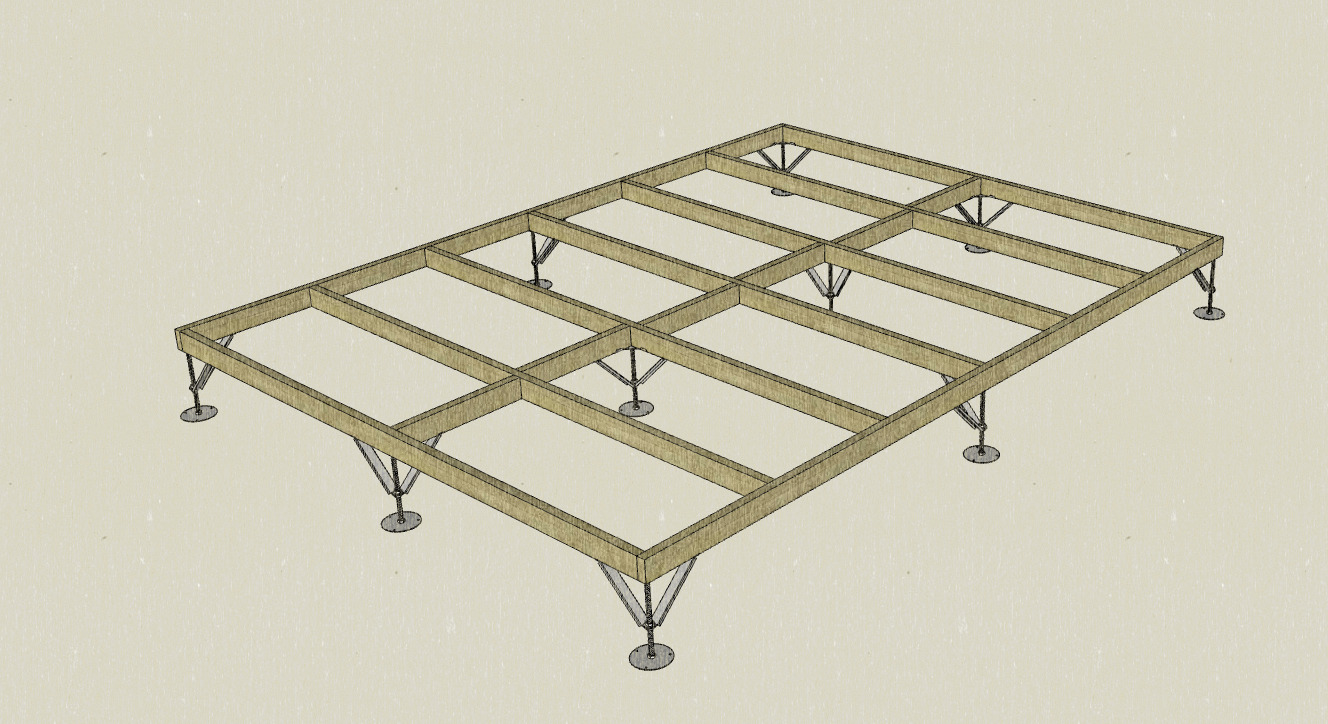
How Many Adjustable Posts Do You Need?
The BASIS system works by distributing the weight of your building across multiple points of contact. In practice, that means placing the posts in a grid under the frame.
For most garden buildings, the layout is straightforward.
Typical spacing:
With standard timber joists (50x100mm or 50x150mm), place a post roughly every 1.5 to 2 metres along the beams.If you want a very solid floor:
Move the posts closer together — around 1.2m spacing. This reduces any feeling of bounce.If the building is light (tool shed, storage):
You can stretch the spacing closer to 2m.
The grid doesn’t need to be perfect before you start digging.
If you uncover something in the ground, a root, a pipe, a stubborn rock, you simply slide the post a little along the beam to a clear spot. That flexibility is one of the advantages of adjustable supports.
👉Calculate how many posts your build needs
Tools Needed for Installation
You don’t need specialized machinery to install an adjustable foundation. Most builders already have the core tools.
The basics are as follows:
- 24mm wrench or an alternative
This is what you use to level the structure. Turning the adjustment nut raises or lowers the frame until the spirit level reads true. - 1–1.2m spirit level
Used to check the frame as you adjust each support point. - Shovel
Needed to dig the small gravel pockets where the posts sit. - Compactable Gravel (MOT Type 1 or similar)
Placed under each post to create a stable contact point and allow drainage. - Impact driver or a drill
Used to fasten the connectors and braces to the timber frame. - Structural wood screws
For securing the adjustable post connectors and stabilizing braces to the frame.
Some sites require one additional tool:
- SDS+ Rotary Hammer with ~22mm Bit (only for rocky ground)
If you encounter bedrock or large stones, drilling a small hole allows the threaded rod to seat securely and prevents the base from sliding.
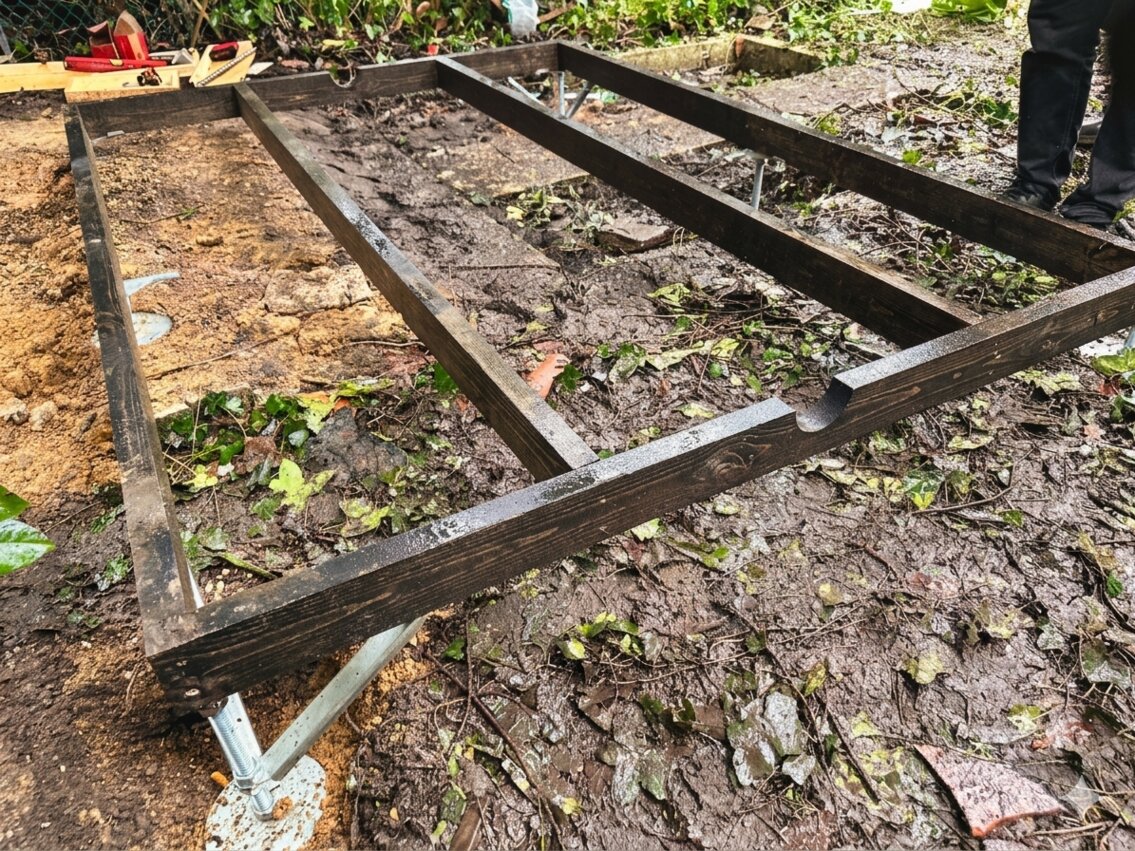
The Assembly Sequence
This sequence keeps the installation simple and avoids unnecessary lifting or rework.
By assembling the frame first and marking the ground directly with the posts, you ensure that every support point ends up exactly where it should.
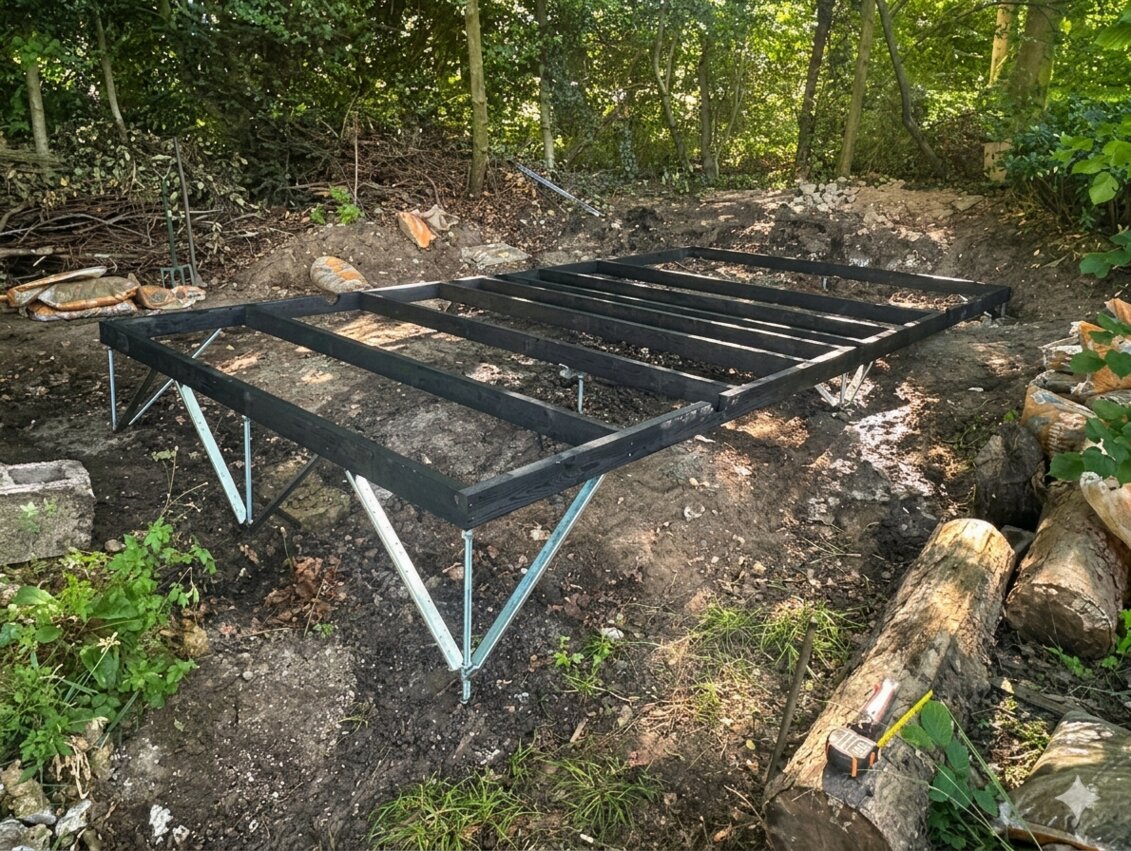
Build the Frame
Assemble your timber frame and turn it upside down.
This allows you to do all fastening work from above.Attach the Adjustable Posts
Fasten the posts to the frame while everything is still accessible and easy to reach.
To prevent the base plates from falling off when flipping the frame, place a small piece of tape over the ends of the threaded rods.Flip the Frame and Position It
Flip the frame so the adjustable posts point downward, then move it to the exact location where the building will sit.Mark the Contact Points
Press the frame down slightly so the tips of the threaded rods mark the ground.
These marks show precisely where each gravel pad or anchor point needs to be prepared.If you already know the layout and only need rough placement, you can also mark the post locations before flipping the frame. However, using the threaded rod tips provides the most accurate positioning, especially if you plan to drill anchor holes in rock.
Prepare the Ground
Move the frame aside and prepare the marked locations:- dig and compact gravel pads on soil
- or drill anchor holes if building on rock
Move the Frame Into Position
Place it back onto the prepared contact points.Level the Frame
Identify the highest ground point and set that post to its lowest adjustment.
This becomes your reference point.
Use a wrench to raise the lower corners until the spirit level reads level.Bring the Remaining Posts Into Contact
Once the outer frame is level, turn the nuts on the remaining posts until they make firm contact with the ground.Pre-Load the Supports
Give each post a slight additional turn so the structure is evenly supported.
Walk around on the frame or tap it lightly to ensure everything has settled before continuing the build.
What Does This Cost vs. Traditional Methods?
For 3×4m shed on 20cm slope:
Adjustable Posts (BASIS)
- 8 posts: €480-600
- Gravel for pads: €40-60
- Total materials: €520-660
- Installation: 3-4 hours DIY
- Timeline: Same day installation
Concrete Slab (Traditional)
- Excavation: €600-1,200
- Retaining wall (20cm slope): €800-1,500
- Concrete materials: €400-700
- Labor: €800-1,500
- Total: €2,600-4,900
- Timeline: 7-11 days
If ground settles later:
- Concrete: Break and repour (€1,500-3,000)
- Adjustable: Turn nut with wrench (15 minutes, €0)
When Adjustable Posts, Ground Screws, or Concrete Make Sense
Choose adjustable posts if:
- Slope is 8–60cm
- Want to preserve landscape (minimal excavation)
- Need same-day installation
- Ground may settle (clay, soft soil)
- May relocate the structure later
- Budget €500–1,000
Choose ground screws if:
- You want a fast, clean foundation without concrete
- Ground is accessible for screw installation equipment
- Soil is stable enough to anchor screws properly
- The structure is permanent but you want minimal excavation
- Budget €1,200–2,500 depending on installation
Choose concrete if:
- Building codes require a continuous foundation
- The structure is a permanent residential building
- Ground is already flat (under ~8cm variation)
- Budget allows €2,000–5,000
- Heavy loads require a slab foundation
Choose blocks & shims if:
- Slope is under ~8cm
- The structure is temporary
- Budget is under €200
- You accept occasional re-leveling
Final Thought
Uneven ground is one of the most common problems when building a shed, sauna, or garden room.
Traditional foundations solve it by forcing the ground to become flat — usually through excavation, concrete, or heavy equipment.
Adjustable foundations solve the same problem differently.
Instead of reshaping the entire site, they simply regulate the height of each support point until the structure sits level.
That approach makes installation faster, less disruptive to the landscape, and far easier to correct later if the ground moves.
If you’re planning a project on uneven ground, you can explore the BASIS adjustable foundation system here:
→ View the BASIS adjustable foundation posts
Not sure which approach fits your site?
Send us three things:
- Building dimensions (e.g., 3×4m shed)
- Slope measurement (vertical drop from high to low corner)
- Photo of the location
We'll recommend post quantity, model, and estimated cost within 24 hours.